


My Problem
In my job, I often need some information to stay on top of eveything. I’ve tried may types of stickit notes and other programs, but they all seem to be too large and not easy to script. I also need information from several systems in my home network. Therefore, I created the original BulletinBoard in NW.js that works quite well, but now I need to make it smaller. Also, the old code is kind of hacky. NW.js is a great way to build applications using HTML, CSS, and JavaScript. Since it is so easy to use, I’ve used it to create first pass demo applications. The problem with it is that it’s a full Chrome web browser. For a small application, that is just too much wasted memory. Therefore, I’m doing a full redesign in Wails to bring down it’s footprint.
Wails
Wails is a go language program to create HTML, CSS, and JavaScript applications with a go language backend. It creates really small builds because it uses a system HTML browser that is minimal in size (and therefore, minimal APIs). This allows the program to work on Windows, Linux, and macOS and still have a very small footprint. I’ve converted several of my programs to Wails: Modal File Manager, EmailIt, and ScriptBar.
In order to get the same functionality with the original BulletinBoard program, I need to have a full web server built in. The orginal version allowed me to do just that with the Node.js backend. Now, I need to figure out how to do the same with go lang and still work with Wails.
Wails already runs a web server backend (I suspect it is web sockets based) to work with the frontend of the program. Since I can’t piggy back on it, I have to have a separate web server backend. This is necessary since the frontend JavaScript doesn’t support doing a server.
The question becomes: Can you run a separate web server on the same go backend?
Things Wails Currently Doesn’t Do
While writing this article, Wails 2 is still in development and doesn’t have every feature needed for this application. For instance, it can’t run with the Dock icon not showing and a menubar icon only. Those are still in the works. But, it can control the hiding and showing of the program. It can also make the window always on top. Therefore, most of the functionality is ready for this application.
Bulletin Board Design
The go language has several backends for running a web server. I’ve decided to use the gin backend since it is real easy to use and seems to be the most popular one. I’ve only done one project in go before, but it is an easy language to pickup.
The design is based on an API backend that receives GET requests on the route /api/messages/:message with the :message is the message to display. The same message is in the body in JSON format as:
{
  msg: message
}
Where message is the same text in the web address. It's done this way because of the original design was first based on the web address only, but longer messages needed the body. It is a hack, but it worked and there isn’t time to change everything! Also, a GET request is easy to implement in scripting languages (like using wget or curl command line programs).
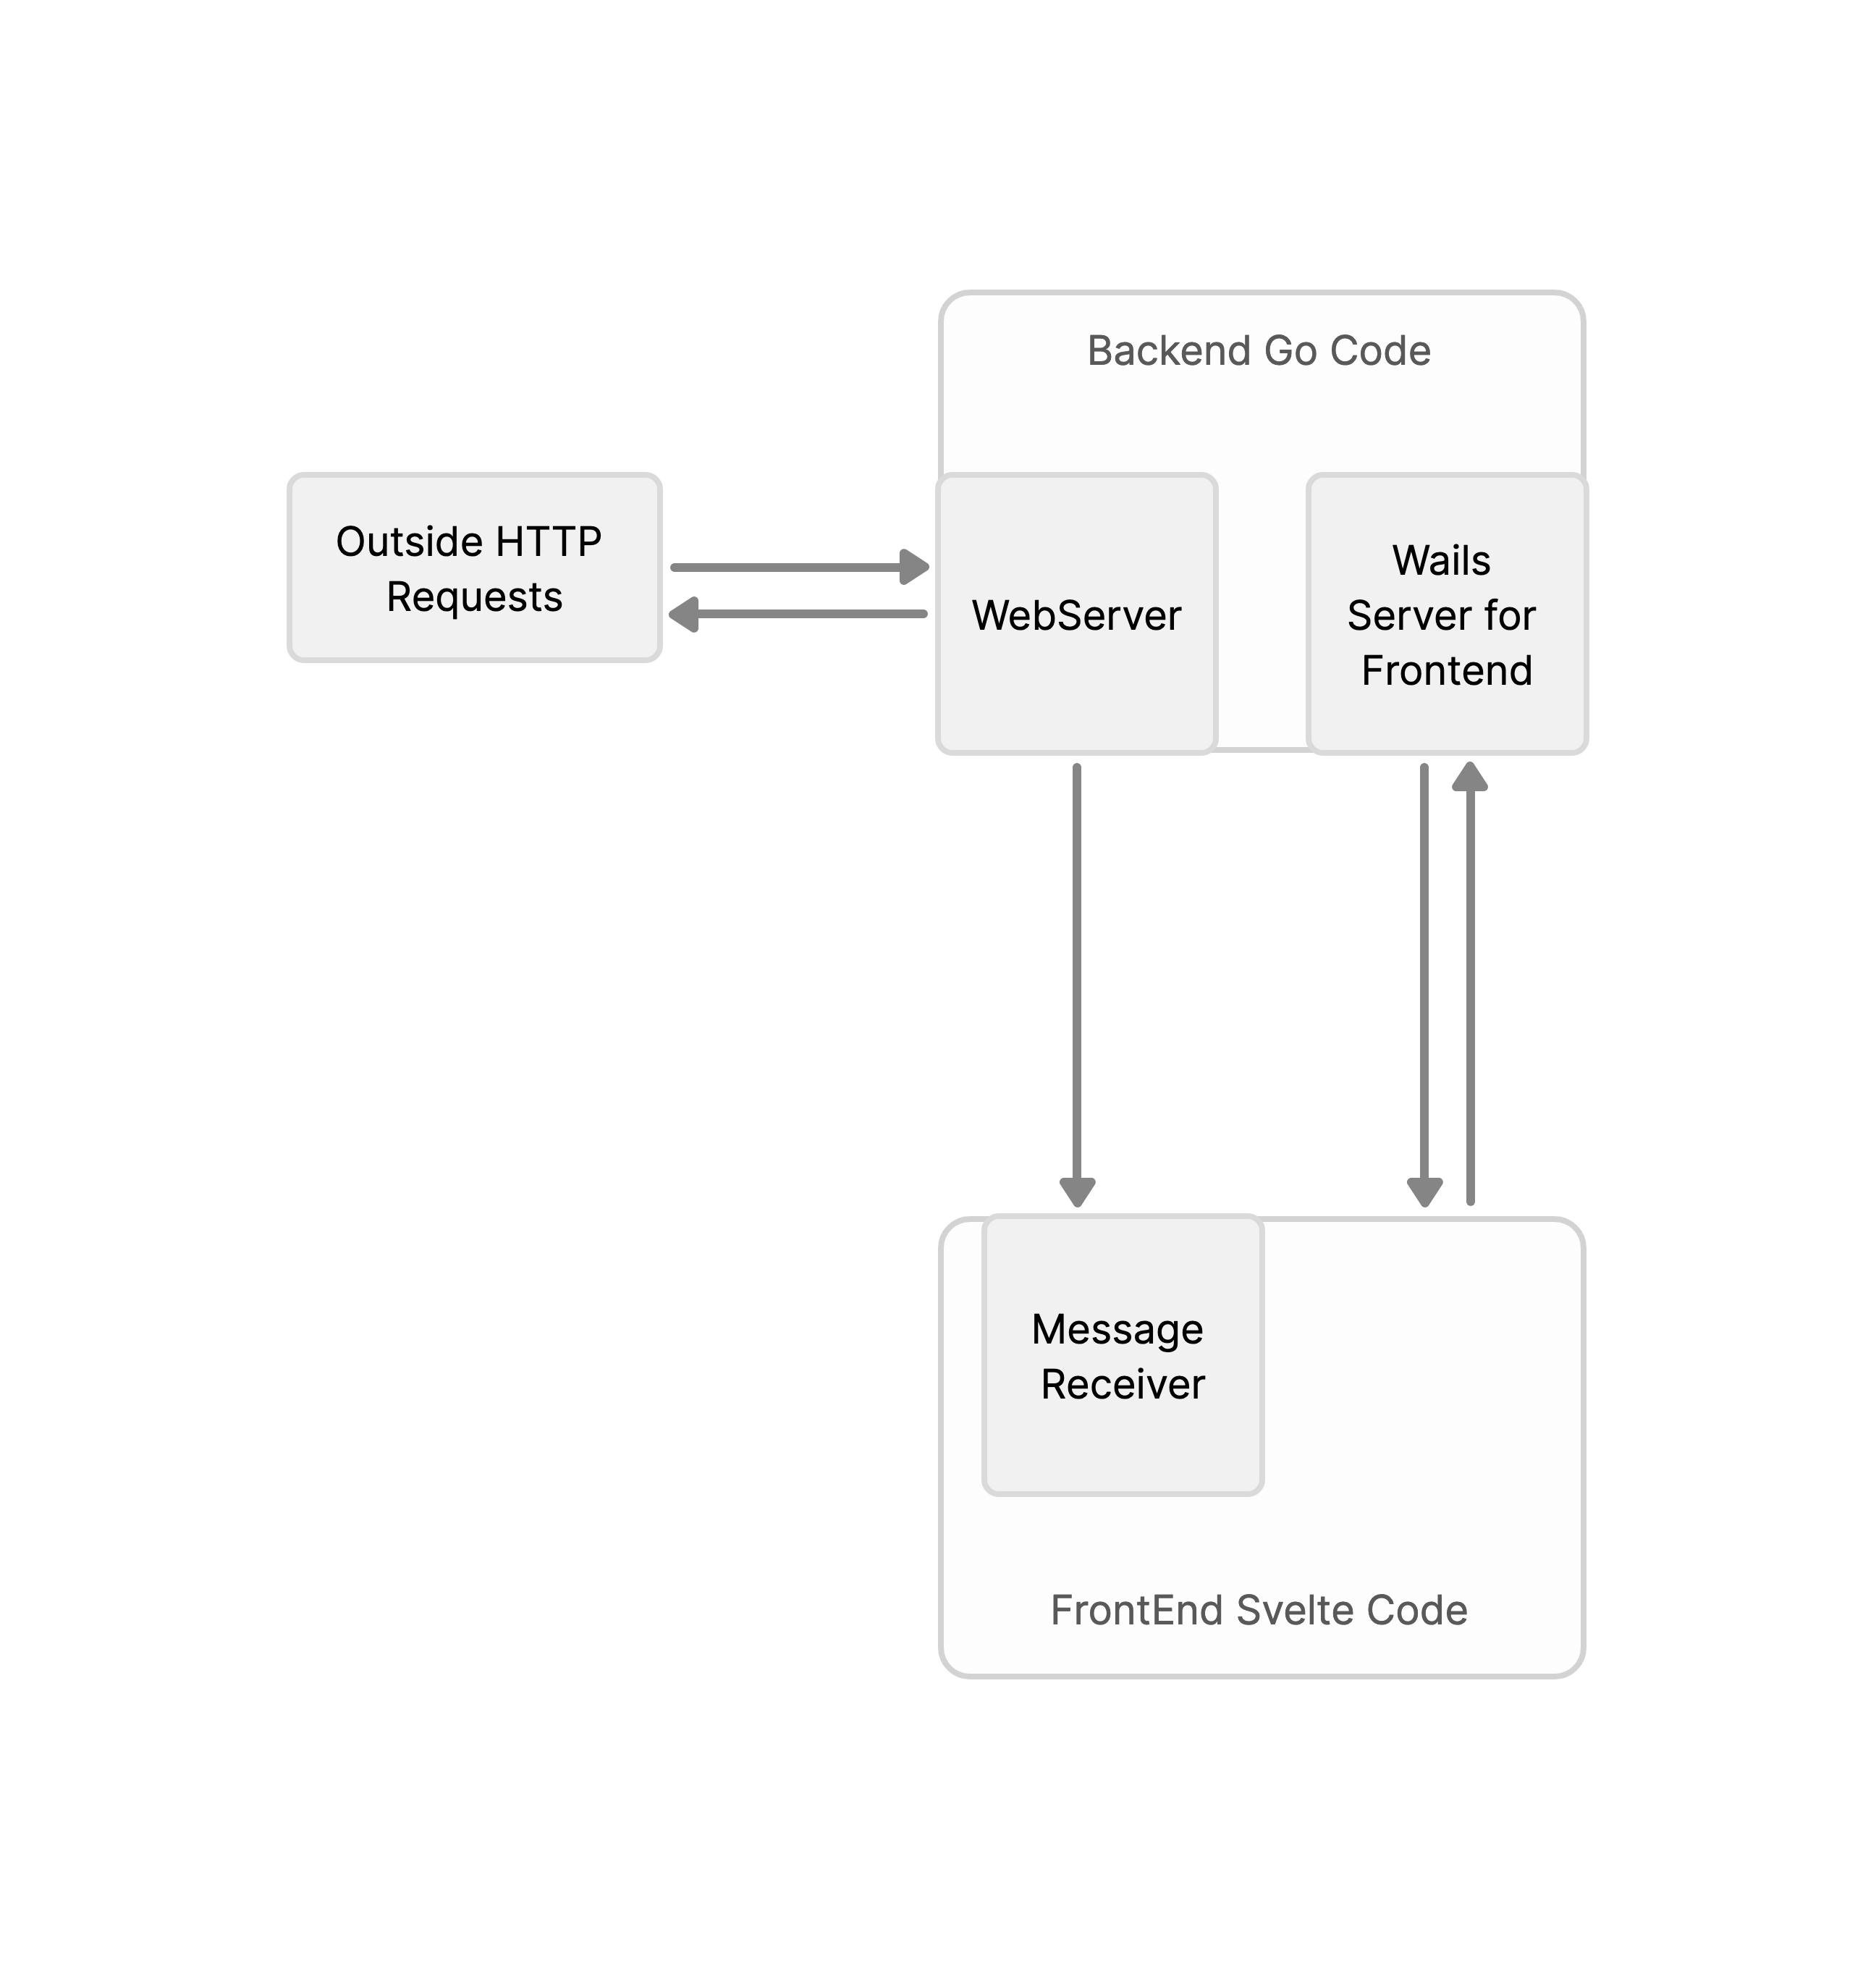
BulletinBoard Communications - Made with OneModel
The backend receives this request and uses signals to pass it to the frontend. Wails has a great event based message sending framework. The frontend is done using Svelte. The original was plain JavaScript and HTML and not too pretty (Okay, it was a quick hack). Now, I’m using a nice framework to build a modular system that is easy to expand.
The original design allowed for dialogs to send back information as well. For this project, I’m just doing the messaging system to see if I can get it to work using Wails and the go language server.
Let’s Get Started
To get started, you need to install nodejs with npm, go language, and Wails 2. I’m using version 43 of Wails 2 in this article.
Create a directory for your project and run the following command line to initialize a Wails project with Svelte:
wails -n “BulletinBoard” -d . -t “svelte"
This will create a Svelte frontend Wails project with normal JavaScript. If you want to use TypeScript, use the template “svelte-ts”.
The first thing is to setup the main.go file as shown below:
package main

import (
    "embed"

    "github.com/wailsapp/wails/v2"
    "github.com/wailsapp/wails/v2/pkg/options"
    "github.com/wailsapp/wails/v2/pkg/options/mac"
)

//go:embed frontend/dist
var assets embed.FS

//go:embed build/appicon.png
var icon []byte

func main() {
    // Create an instance of the app structure
    app := NewApp()

    // Create application with options
    err := wails.Run(&options.App{
        Title:             "BulletinBoard",
        Width:             100,
        Height:            60,
        Assets:            assets,
        BackgroundColour:  &options.RGBA{R: 27, G: 38, B: 54, A: 0},
        DisableResize:     true,
        Fullscreen:        false,
        Frameless:         false,
        StartHidden:       true,
        AlwaysOnTop:       true,
        HideWindowOnClose: true,
        OnStartup:         app.startup,
        OnDomReady:        app.domReady,
        OnShutdown:        app.shutdown,
        Bind: []interface{}{
            app,
        },
        Mac: &mac.Options{
            TitleBar:             mac.TitleBarHiddenInset(),
            Appearance:           mac.NSAppearanceNameDarkAqua,
            WebviewIsTransparent: true,
            WindowIsTranslucent:  true,
            About: &mac.AboutInfo{
                Title:   "BulletinBoard",
                Message: "© 2022 Richard Guay <raguay@customct.com>",
                Icon:    icon,
            },
        },
    })

    if err != nil {
        println("Error:", err.Error())
    }
}
This setups a typical program with transparent backgrounds and hidden on startup. The OnStartup entry is set to app.startup which is where we will launch our server. Launching the server at this location will have all the custom code in one place and allows the Wails server for the frontend to be initialized first.
Next, we need to create our application logic in the app.go file. Add the following information:
package main

import (
    "context"
    "github.com/gin-gonic/gin”    // webserver framework
    rt "github.com/wailsapp/wails/v2/pkg/runtime”. // Wails runtime
    "net/http"
    "net/url"
)

// App struct
type App struct {
    ctx context.Context
}

// NewApp creates a new App application struct
func NewApp() *App {
    return &App{}
}

func (a *App) domReady(ctx context.Context) {

}

func (a *App) shutdown(ctx context.Context) {

}

// startup is called when the app starts. The context is saved
// so we can call the runtime methods
func (a *App) startup(ctx context.Context) {
    a.ctx = ctx

    //
    // We need to start the backend and setup the signaling.
    //
    go backend(ctx)
}
This is mostly setup code except for the startup function. The ctx variable is the context for the whole application and is needed for the server to run. It is passed to the server using the line:
go backend(ctx)
The go at the front of the backend function name tells go to run the server as a go coroutine. This runs on a separate thread that doesn’t interfere with the other frontend code. This allows the server to run without bothering anything else and makes this project functional.
Then add the following to the bottom of the app.go file:
type Msg struct {
    Message string `json:"msg" xml:"user"  binding:"required"`
}

func backend(ctx context.Context) {
    //
    // This will have the web server backend for BulletinBoard.
    //
    r := gin.Default()
    r.Use(gin.Recovery())

    //
    // Define the message route. The message is given on the URI string and in the body.
    //
    r.GET("/api/message/:message", func(c *gin.Context) {
        c.JSON(http.StatusOK, gin.H{
            "msg": "okay",
        })
        var json Msg
        if err := c.ShouldBindJSON(&json); err != nil {
            c.JSON(http.StatusBadRequest, gin.H{"error": err.Error()})
            return
        }
        message := c.Param("message")
        messageBody := json.Message
        if messageBody != message {
            message = messageBody
        }

        message, err := url.QueryUnescape(message)
        if err != nil {
            // An error in decoding.
            message = ""
        }

        //
        // Send it to the frontend.
        //
        rt.EventsEmit(ctx, "message", message)
    })

    //
    // Run the server.
    //
    r.Run(":9697")
}
This is a basic setup for a single route in the gin web server framework. It is very basic right now, but very functional. I need to add middleware that does security checking to make the program more secure. But, we just want to demostrate that this approach is possible.
The function for the route gets the message from the URI and the body JSON structure. It then decodes it from URI encoding and checks to see if they are the same. If so, just send on the one from the URL. Otherwise, it sends the one from the body.
The interesting part is the next line that uses Wails runtime rt.EventsEmit() function to tell the frontend that we have a new message to display. The event has the name “message” that the frontend will receive and setup for displaying a message. This is important for expanding for other types in the future.
In the frontend/src/main.js file, add this information:
import BulletinBoard from './BulletinBoard.svelte'

const app = new BulletinBoard({
  target: document.body
})

export default BulletinBoard
This is simple boilerplate code for starting a Svelte application. The BulletinBoard.svelte file is the main program.
Now for the main program. Create the BulletinBoard.svelte file with the frontend/src directory with the following code:
<script>
  import { onMount, afterUpdate } from "svelte";
  import Message from "./components/Message.svelte";
  import { state } from "./stores/state.js";
  import { theme } from "./stores/theme.js";
  import { message } from "./stores/message.js";
  import * as rt from "../wailsjs/runtime/runtime.js"; // the runtime for Wails2

  let containerDOM = null;
  let minWidth = 300;
  let minHeight = 60;

  onMount(() => {
    $state = "nothing";
    getTheme();

    //
    // Set a function to run when a event (signal) is sent from the webserver.
    //
    rt.EventsOn("message", (msg) => {
      if (msg.trim().length !== 0) {
        //
        // Set the message state and save the message in the store.
        //
        $state = "message";
        $message = msg;

        //
        // Show window in case it's off.
        //
        rt.WindowShow();
      } else {
        //
        // An empty message send by having just a space turns off the BulletinBoard.
        //
        rt.WindowHide();
      }
    });
  });

  afterUpdate(() => {
    //
    // The nothing state should force a window hiding.
    //
    if($state === "nothing") {
      rt.WindowHide();
    }

    //
    // Figure out the width and height of the new canvas.
    //
    if (containerDOM !== null) {
        let width = minWidth;
        let height = minHeight;
        if (height < containerDOM.clientHeight) height = containerDOM.clientHeight;
        if (width < containerDOM.clientWidth) width = containerDOM.clientWidth;
      rt.WindowSetSize(width, height);
    }
  });

  function getTheme(callback) {
    //
    // This would read the theme from a file. It currently just sets a typical theme.
    // I love the Dracula color theme.
    //
    $theme = {
      font: "Fira Code, Menlo",
      fontSize: "12pt",
      textAreaColor: "#454158",
      backgroundColor: "#22212C",
      textColor: "#80ffea",
      borderColor: "#1B1A23",
      Cyan: "#80FFEA",
      Green: "#8AFF80",
      Orange: "#FFCA80",
      Pink: "#FF80BF",
      Purple: "#9580FF",
      Red: "#FF9580",
      Yellow: "#FFFF80",
    };
  }
</script>

<div
  id=“closure"
  bind:this={containerDOM}
  style="background-color: {$theme.backgroundColor}; color:
  {$theme.textColor}; font-family: {$theme.font}; font-size:
  {$theme.fontSize};"
>
  <div id="header" data-wails-drag>
    <h3>Bulletin Board</h3>
  </div>
  <div id="main">
    {#if $state === "message"}
      <Message />
    {/if}
  </div>
</div>

<style>
  :global(body) {
    margin: 0px;
    padding: 0px;
    overflow: hidden;
    border: transparent solid 1px;
    border-radius: 10px;
    background-color: transparent;
  }

  #closure {
    display: flex;
    flex-direction: column;
    margin: 0px;
    padding: 0px;
    border-radius: 10px;
    overflow: hidden;
  }

  #header {
    height: 20px;
    margin: 0px;
    padding: 5px;
    -webkit-user-select: none;
    user-select: none;
    cursor: default;
  }

  #main {
    display: flex;
    flex-direction: column;
    margin: 0px 0px 0px 20px;
    padding: 0px;
    min-width: 100px;
  }

  h3 {
    text-align: center;
    margin: 0px;
    padding: 0px;
    cursor: default;
    font-size: 1 em;
  }
</style>
The onMount function tells Svelte compiler to run the code while mounting this component. This code initializes the theme stored in the $theme state store. The function then sets up the event receiver to receive “message” events using the rt.EventsOn function. When it gets a message, it sets the $message store variable to it and sets the $state store variable to “message”. This tells the HTML code to show the Message component and show the window using rt.ShowWindow().
The bind:this={containerDOM} will put the DOM node into the variable containerDOM. This can then be queried to find out information about the div node that contains the message.
The next interesting bit of code is in the afterUpdate function call. This sets a function to call after all components are setup and visible. In this one, it first sets the window to hidden if the state equals “nothing”. Therefore, it creates an easy way to hide the window from anywhere simply by setting the state variable. Secondly, it uses the containerDOM variable to adjust the window size based on the application div size. It also keeps it from getting too small.
The rest of the code simply sets up the HTML and CSS for creating the main window. Now, we can go on to the Message component.
Now create the frontend/src/components/ directory and create the Message.svelte file with this information:
<script>
  import { message } from "../stores/message.js";
</script>

<div id="message">
  <span>{$message}</span>
</div>

<style>
  #message {
    display: flex;
    flex-direction: column;
    margin: 0px;
    padding: 10px;
  }
</style>
This is an easy component since it just displays a message. You might be thinking that I’m showing unsantitize user given information in the HTML with the line {$message}. The brackets tell Svelte to get the result of the JavaScript expression, santitize it, and display it. Here, we are displaying the information in the $message store variable. Since Svelte does the sanitizing, I don’t have to worry about it.
This looks very trivial to make a full component, but this is modular design. I just add more components for doing different types of displaying. The other display types will have much more code in them.
The remaining parts are the different Svelte stores used in this project. The different stores are in the directory frontend/src/stores and can seen in the GitHub BulletinBoard project page. This is an ongoing project and this repro reflects that with more functionality being written each week….well, when I have time for them.
The application is built with the command line:
wails build --platform "darwin/universal”
Which creates a macOS universal binary and bundles it all up in an application bundle called BulletinBoard.app in the build/bin directory.
If you aren’t on a macOS system, then just use:
wails build
When the application is ran, a requester dialog asking if you want it to allow the program to accept incoming network connections will appear (macOS only). Simply allow it and the program is running. But wait, nothing shows up. That is because the application was started in the hidden state. In order for the program to become visible, it has to receive a message request.
In order to send messages to it, you have to create a message sending program. This is done with a small ruby script:
#!/usr/bin/env ruby
require 'net/http'
require 'json'

def uri_encode(str)
  str.gsub(URI::UNSAFE) do |match|
    match.each_byte.map { |c| sprintf('%%%02X', c.ord) }.join
  end
end
if ARGV[0] == '-' then
  message = ''
else
  message = uri_encode(ARGV[0])
end

uri = URI("http://localhost:9697/api/message/#{message}")
http = Net::HTTP.new(uri.host, uri.port)
req = Net::HTTP::Get.new(uri.path, 'Content-Type' => 'application/json')
req.body = {msg: "#{message}"}.to_json
res = http.request(req)
puts "response #{res.body}”
If you put this in a file named ‘sendmsg’ and set it to executable, you can type the following command line:
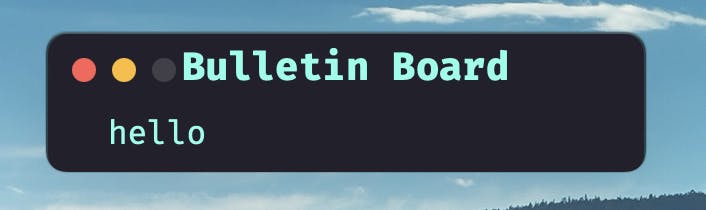
sendmsg “hello”
The BulletinBoard application will show up like this:
Conclusion
This tutorial just proved that there can be multiple web servers inside of a single Wails application thanks to the go language's use of coroutines. This works great and now I can finish the other functions. I want to be able to display script supplied dialogs to the user and return JSON data structure with the results.
If your interested in keeping up with this project or simply want to download the source yourself, you can find it on the GitHub page for BulletinBoard. It already doesn’t look like it does here since it is an ongoing project. It has a discussion board for asking questions or just to comment on it.
On to the next steps!
Note: The article picture is from Envato Elements.